Skip to Main Content

Strozier Instruction Room AV Equipment

A guide covering how to use and troubleshoot the AV equipment in both Strozier instruction rooms.

Use the Room's Camera, Microphones and Instructor Station for Skype Sessions

Both instruction rooms possess video cameras and ceiling-mounted microphones. After following the steps below, you should be able to use both as inputs for Skype.

Please take note: the image presented to Skype by default is a splitscreen comprised of the projected image (107A: "Front Projector") on one side and the output from the camera on the other. Other options are available.

Remote controls for the camera are stored in the podium. You will need a key, but each department has a set.

Touchpad: drag the "Desktop PC" icon onto the projector (107A: "Front Projector") input area.

See the note above. Using a projected image is not strictly required.

Start Skype on the instructor station.

Adjust Skype's settings via Tools >> Options.

 
Locate Skype's options via the "Tools" menu item.
 

Audio settings: select "Digital Audio Interface (2-XI100DUSB-HDMI Audio)" from the "Microphone" dropdown menu.

 
"Digital Audio Interface" corresponds to the room's ceiling-mounted microphones.
 

Video settings: select "XI100DUSB-HDMI Video" from the "Select webcam" dropdown menu.

 
This is the camera that faces the instructor station. The camera facing the room belongs to the Polycom system and is not usable as a webcam with Skype.
 

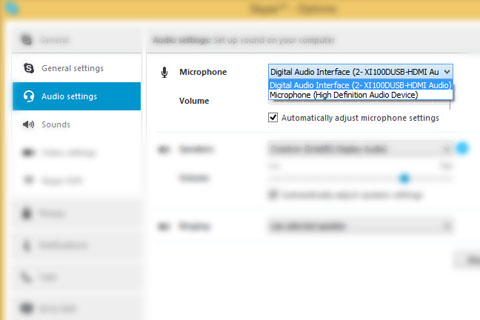
Once you've set Skype to use the appropriate audio and video inputs, you're ready to make a call.

The Florida State University Libraries
FIND & BORROW | RESEARCH & PUBLISH | VISIT & STUDY | COLLECTIONS | ABOUT | HELP & SUPPORT

© 2022 Florida State University Libraries | 116 Honors Way | Tallahassee, FL 32306 | (850) 644-2706